
The Big Bike Refurb (part 1)
Winter is a generally horrible time of year in Scotland. No matter how much you wrap up, waterproof yourself, tell yourself to just man up and hit the mud…… it’s just difficult to get the same hours in and have as much fun as you would on a dry and dusty summer night. With this in mind, and the relative lack of open uplifts and downhill tracks just now, I thought it would be a good time to give my downhill bike a bit of attention.
My commencal is my pride and joy. Those who know me will tell you how possessive I am of it, and what I would do to those who threaten to harm it. However after one and a half years of racing, less than gentle riding, Fort William trips and a week in Morzine, it has been starting to show some signs of abuse which means only one thing…
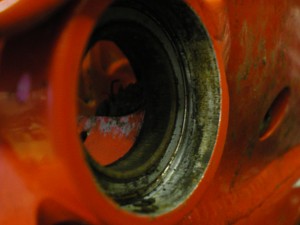
This is what your bearing housing looks like after a year of neglect….
Frame Bearings….. the words alone are enough to put fear in the heart of the amateur mechanic. How do I know they are worn? How often should I replace them? Well fear not. In this blog I will try and talk you through it all. Bearings are sadly not full proof. They are under a lot of stress, and need regular TLC to keep them running smoothly. Signs that your bearings are worn are poorly performing rear suspension, stiff movement of the swing arm with the shock removed, and play from side to side between the main triangle and the swing arm. This may be resolved by cleaning out the bearing housings and giving everything a tighten up again, but it can mean that those little bearings have bitten the dust.
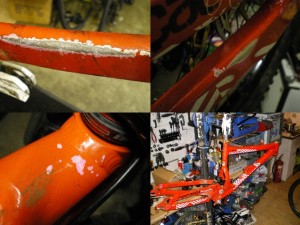 Along with the destruction of my bearings, my riding style has also had a profound effect on the once pristine paint work and decals. As replacing frame bearings also requires a strip down of the bike to a degree, I decided to give the frame a fresh new look. After much consideration, the raw look was the obvious choice but a recent obsession for all things shiny has led me to a polished finish. As this covers many popular areas of bike mechanic stuff and the ‘How to Raw your Frame’ questions that adorn every forum and blog on every biking website in the world, I thought I would give you a step by step for the whole process and you can use my experience to get it right yourself first time!
STEP 1: Strip your Bike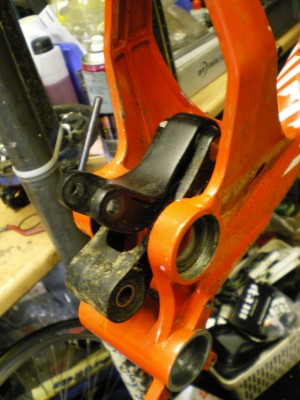
In order to do any work on bearings or paint you first have to remove all the componentry. Id advise this even for bearings that are not occluded as reducing the weight of what you are holding makes it far easier to manoeuvre the frame around when pressing bearings out. This includes undoing all the linkage bolts, and any moving parts have to go, so you are left with two bits of frame (possibly more but you get the idea) with bearings still inside. If you are uncomfortable with this stage then bearing servicing definitely isn’t a job you should be doing yourself. Come speak to one of our mechanics, as there is nothing worse than breaking something because you went beyond what you know how to do!
This is undoubtedly the trickiest bit. Bearings rely on contact area with their surroundings to stay in place, and as such put up a fair fight when you try to remove them sometimes. Tools like a vice, a range of sockets, screwdrivers and specific bearing tools are needed. It requires a bit of inventiveness to combine them by either pressing or tapping the tool onto each bearing to remove it from its surroundings. This may be a process better left to Stevie, Chris or Ross our mechanics, so feel free to pop in for advice or take advantage of their skills for this bit of the job.
STEP 3: Rawing your frame
Finally….the bit you really wanted to read….. and I’m afraid I may give you an answer you don’t want to hear. Rawing your frame yourself is a silly idea. If you want to do it you will need:
- £20 worth of Nitro Mors (a highly toxic paint stripper)
- £10 worth of steel wool and other exfoliating pads
- Very thick gloves (~£10)
- A large old tub (not your bath) to catch the exceptionally harmful drips (of which there will be around 2 litres)
- 15 hours of labour time
- Infinite patience and a very supportive family
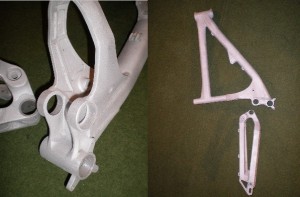
Alternatively, you can let professionals do what they do best. Wheelpro Scotland in Glasgow acid dipped my frame and all for the grand total of NOTHING! All alloy wheel shops will have a ready to go acid vat for these purposes and the most I was quoted from anywhere was a tenner. As such this is the obvious choice and what I would recommend doing. DO note however that you should mask any bearing contact surfaces and bottom bracket threads first as they may use a sand blaster to remove paint residue which is not healthy for threads when used at close quarters. When its all done your frame will be a beautiful ghostly silver of raw aluminium and will look something like this !
STEP 4: Polish
Polishing an aluminium frame is a sure-fire way to get a look few others are rocking out on the trails. For you weight weenies out there getting rid of your paint and the unnecessary oxidised aluminium on the surface can save you almost a kilo by some reckonings. The polishing process also means that dirt is less likely to stick to the frame, so reducing what you pick up on a race run and innevitably dump in the back of your van/car at the end of the day! After extensive research and speaking to those in the know the full package metal polishing kit below coming in at £21.25 is the way to go:
www.metalpolishingsupplies.co.uk/pro-max-alloy-wheel-15pc-polishing-kit
This contains a range of mops, fine working space cones and all the equpiment you will need to polish an aluminium frame. I would recommend giving their instructional video a view as well so you know exactly what to do.

This also relies on you having a hand drill of your own, or a generous friend who can lend you one, or an easily distractable friend you can pinch one from. Polishing a bike by yourself will take around 20 hours to get it to a nice mirror finish. If you feel this is beyond your levels of patience (and for me free time was an issue) you can send it to a professional. Most places in Glasgow averaged a quote of around £150 which to be perfectly honest is daylight robbery. I decided to take the advice of a friend whose bike had been done by a professional in Sussex for £60 and from what I could see the results were sensational. The kind man doing my frame is Kevin Clevett from Sussex Polishers (www.sussexpolishers.co.uk).
Check back with my blog very soon for part 2 in which I will include tips and info on:
- Spraying components
- Fox’s Kashima upgrade programme
- Custom Decals
- The results of the frame polish
- Replacing your bearings
- The finished project